Since its passage in 1990, the Americans with Disabilities Act (ADA) has increased the accessibility of the nation’s buildings and improved the lives of those living with disabilities and the general population as a whole. (If you’ve ever used the ramp at the end of sidewalk to push a stroller, wheel a suitcase or “pop a wheelie”, you’ve also benefited from the ADA’s work). While most ADA standards are primarily the responsibility of the architect, plumbing fixtures require coordination between the architect AND plumbing engineer to ensure compliance. ADA showers in nonresidential buildings have several standards that are commonly overlooked by both parties. While these oversights may go unnoticed by the local code reviewer or inspector, they will be noticed by the first mobility disabled person, attempting to use the shower.
ACCESS CLEARANCES
The 2010 ADA Standards, Chapter. Six, regulating accessible plumbing fixtures, defines several types of accessible bathtubs and showers. Transfer showers are most commonly used in nonresidential buildings because they have the smallest footprint. A person in a wheelchair would access a transfer shower by transferring sideways from the wheel chair to a built-in shower seat. Section 608.2.1 requires that a transfer shower compartment have 36 inches by 36 inches inner dimensions. While shower compartments with larger dimensions may be sold with a seat and grab bars, they are not technically ADA compliant (and should not be listed as such by the manufacturer). Figure 1 (below) shows the dimensions of a transfer shower compartment and the required immediate outer clearance.
So who’s technically responsible for compliance? While the architect will usually provide/confirm the clearance in front of the shower, the plumbing engineer should habitually double-check them.
SHOWER HEAD LOCATION
As shown in Fig.1, the 48 inches of clearance is measured from the control wall (i.e. the wall with the shower head). Design Pitfall: If only 48 inches of clearance is provided in the shower stall, a simple design mistake is to put the shower head on the wrong wall. For example, if there was a stall divider installed in line with the control wall (see Fig. 1), then the total clearance would be 48 inches. If the shower head was installed on the wall labeled ‘seat wall’, and the seat was installed on the wall labeled ‘control wall’, the seat would be located opposite the clearance, and the shower would be unusable to someone in a wheel chair.
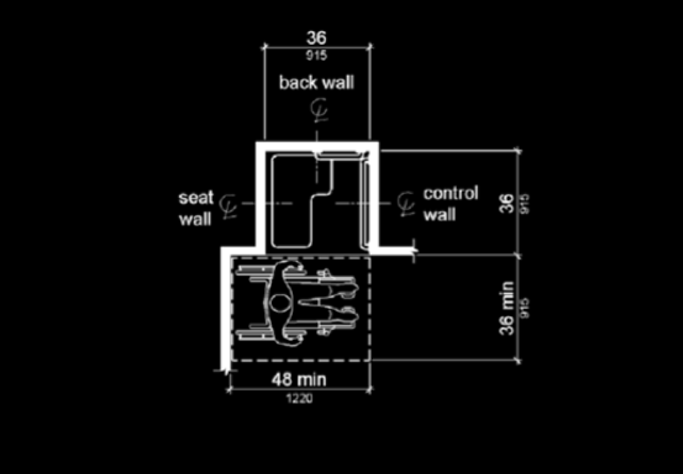
Figure 1. ADA Compliant Transfer Shower Size and Required Clearance (SOURCE: Figure 608.2.1, 2010 ADA Standards)
SHOWER THRESHOLD
The shower threshold on ADA showers must also be coordinated between the architect and plumbing engineer. Section 608.7 requires the following for thresholds on transfer showers:
- Maximum half-inch height
- Beveled, rounded, or vertical
- Exceptions for existing facilities
Prefabricated, ADA-compliant shower basins should have compliant-sized thresholds. However, the installation of these basins may require recession into the floor or adjustment of the shower room floor. Again, this requires early coordination with the architect and possibly the structural engineer. Since a half- inch threshold will not retain a large quantity of water, designing the outer floor to slope to a drain is a wise design practice. This can be done by sloping the floor away from the shower threshold, towards a floor drain. Or a more seamless design–slope the outer floor toward the shower, providing a shower pan with no threshold so any water that splashes out of the shower flows back to the shower drain (see Fig. 2).
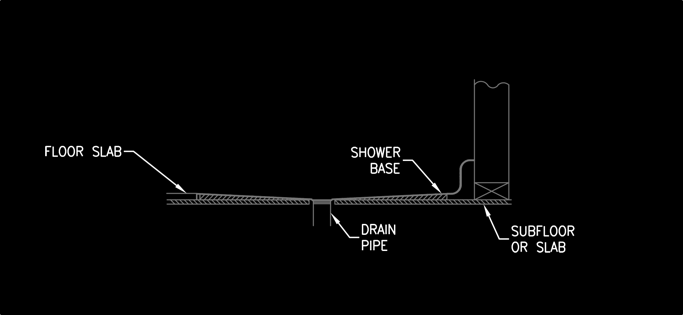
Figure 2. Barrier-Free Shower Pan Sloped Towards Shower
Early coordination of the access, shower head location and threshold for transfer showers helps ensure compliance. The ADA Standards detail several other items pertaining to showers and other plumbing fixtures. These standards are written in plain language with descriptive figures. They are more accessible than most standard codes. I highly encourage all plumbing engineers to reference them early and frequently, coupled with early project team coordination to avoid preventable challenges as much as possible.